


Beyond the Surface – A Professional Guide to Crack Repair
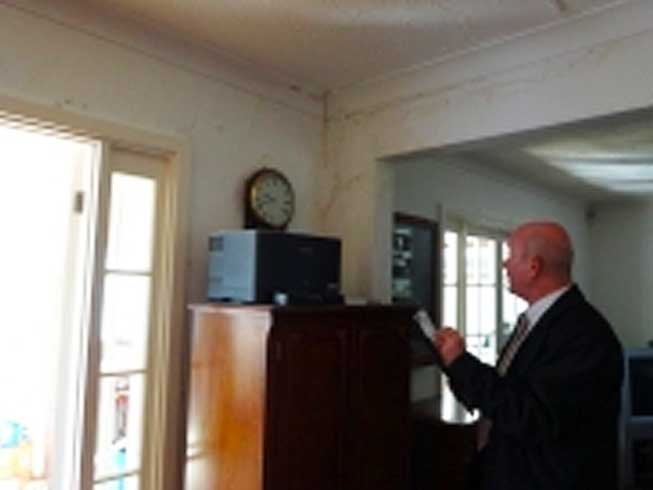
Finding a crack in your walls can be a source of immediate stress for any homeowner. However, once you have addressed the root cause, whether it was a leaking pipe, subsidence, or invasive tree roots, the focus shifts to the repair.
Many people make the mistake of simply filling a crack with standard filler, only to see it reappear some time later. This happens because buildings are dynamic; they move and breathe, especially during the "rehydration" phase after structural stabilisation. To achieve a professional, permanent finish, you need a repair that does not just hide the crack, but manages the movement behind it.
In this guide, we break down our four-stage process for fixing internal cracks, provided that the root cause has been rectified. Therefore, by using a "slip plane" method and reinforced materials, we ensure your walls remain seamless and crack-free, even as the building settles back into its original position.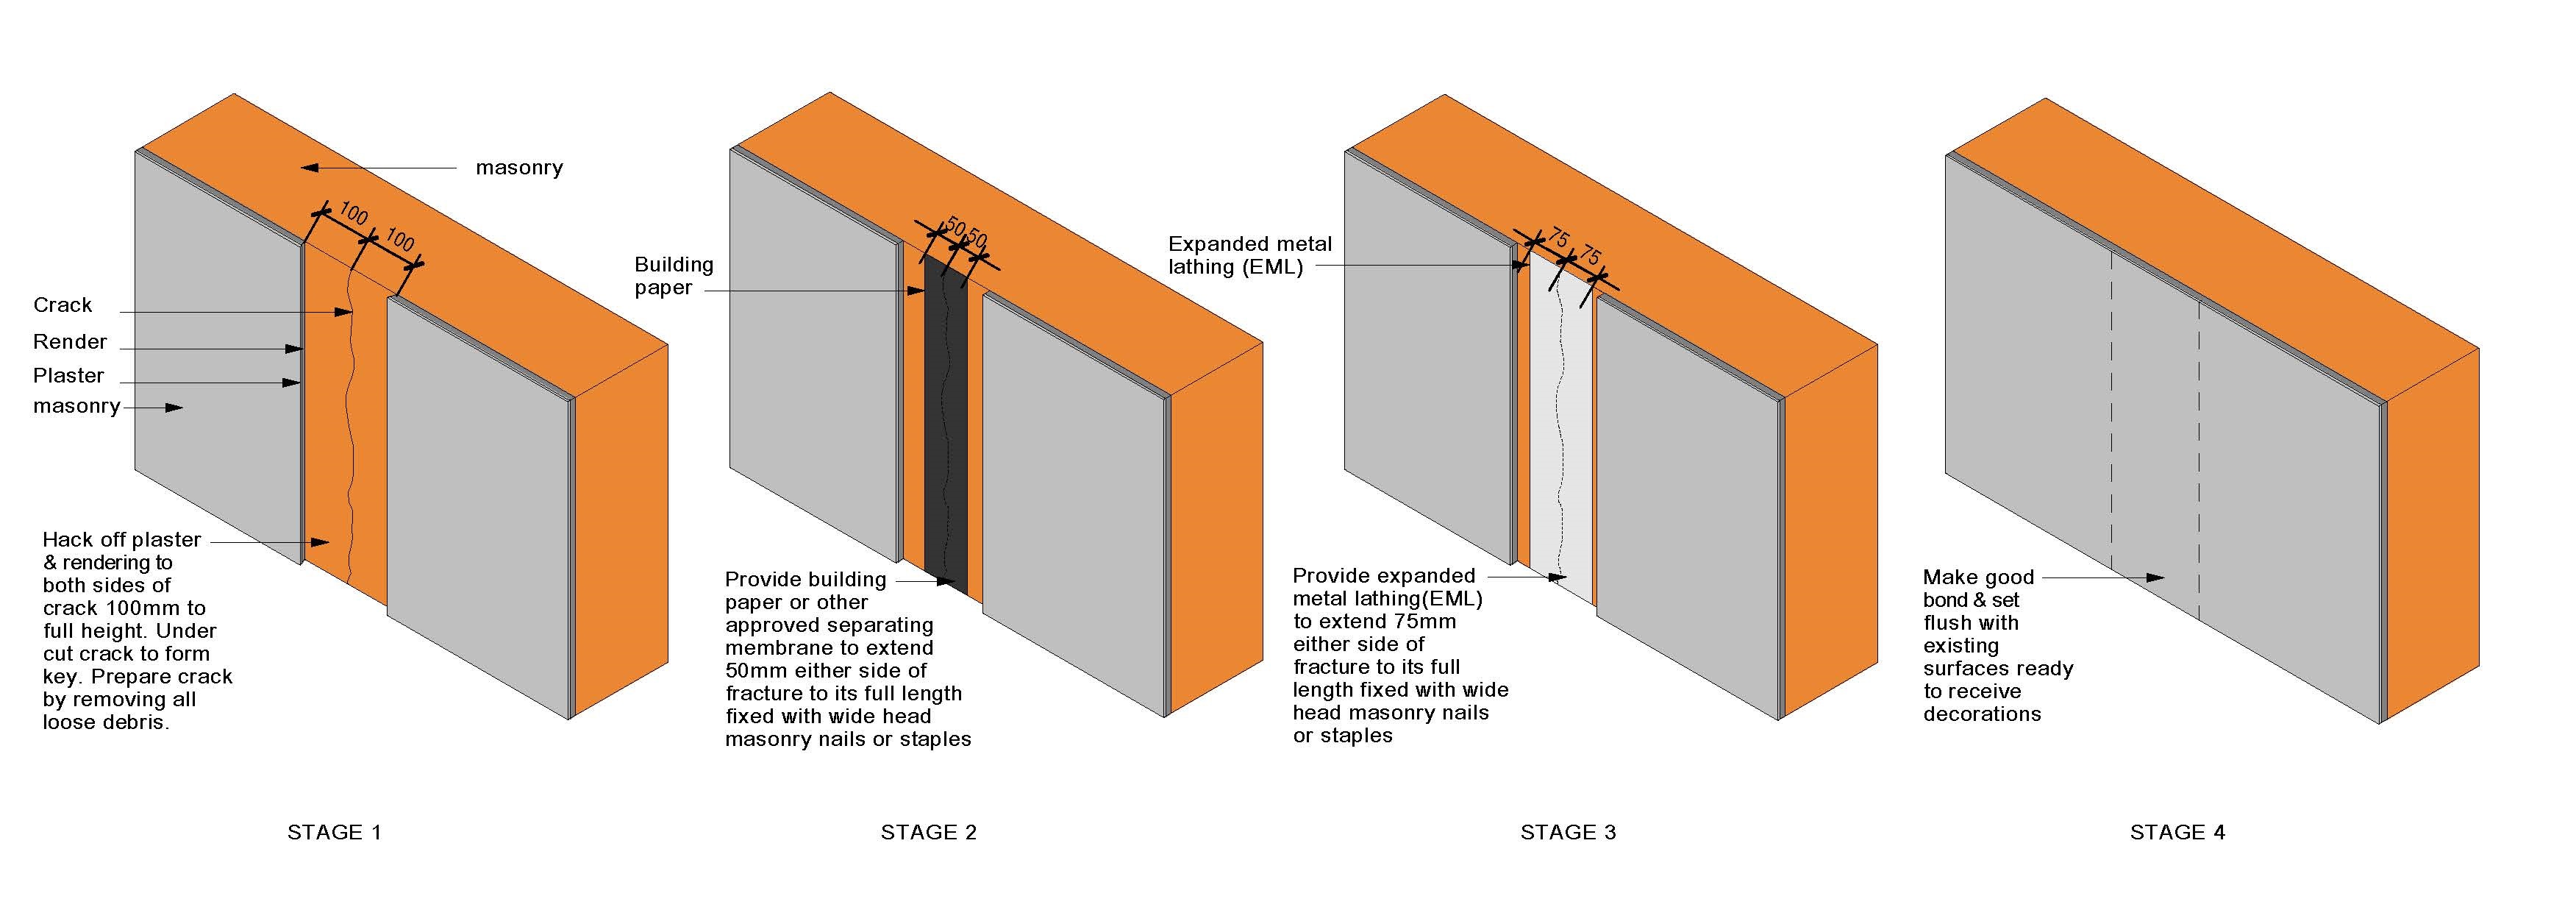
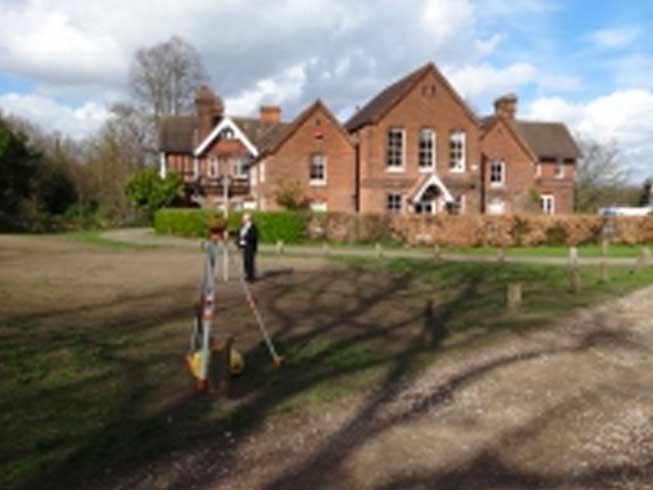
In this particular case, the crack repairs are following subsidence caused by Poplar tree roots that were in close proximity to the building. The cause was rectified by the installation of an approved tree root barrier.
The rectification of the cracking symptom was initially to the masonry substrate by way of an approved masonry resin injected into the cracks, but this could have been dealt with by suitable metal anchors or by masonry stitching, depending upon the size of the cracking as described under BRE Digest 251.
The symptom of cracking to the plaster and rendering, which is the subject matter of this guide, is described below.
How to fix the render and plaster crack: Preparing for the Repair
Effective repair starts only after the primary cause of the cracking has been rectified. With the structure stabilised, work can begin to restore the masonry render, plaster and decorations. Reference to masonry repairs is briefly described above. This guide concentrates on render and plaster repairs only.
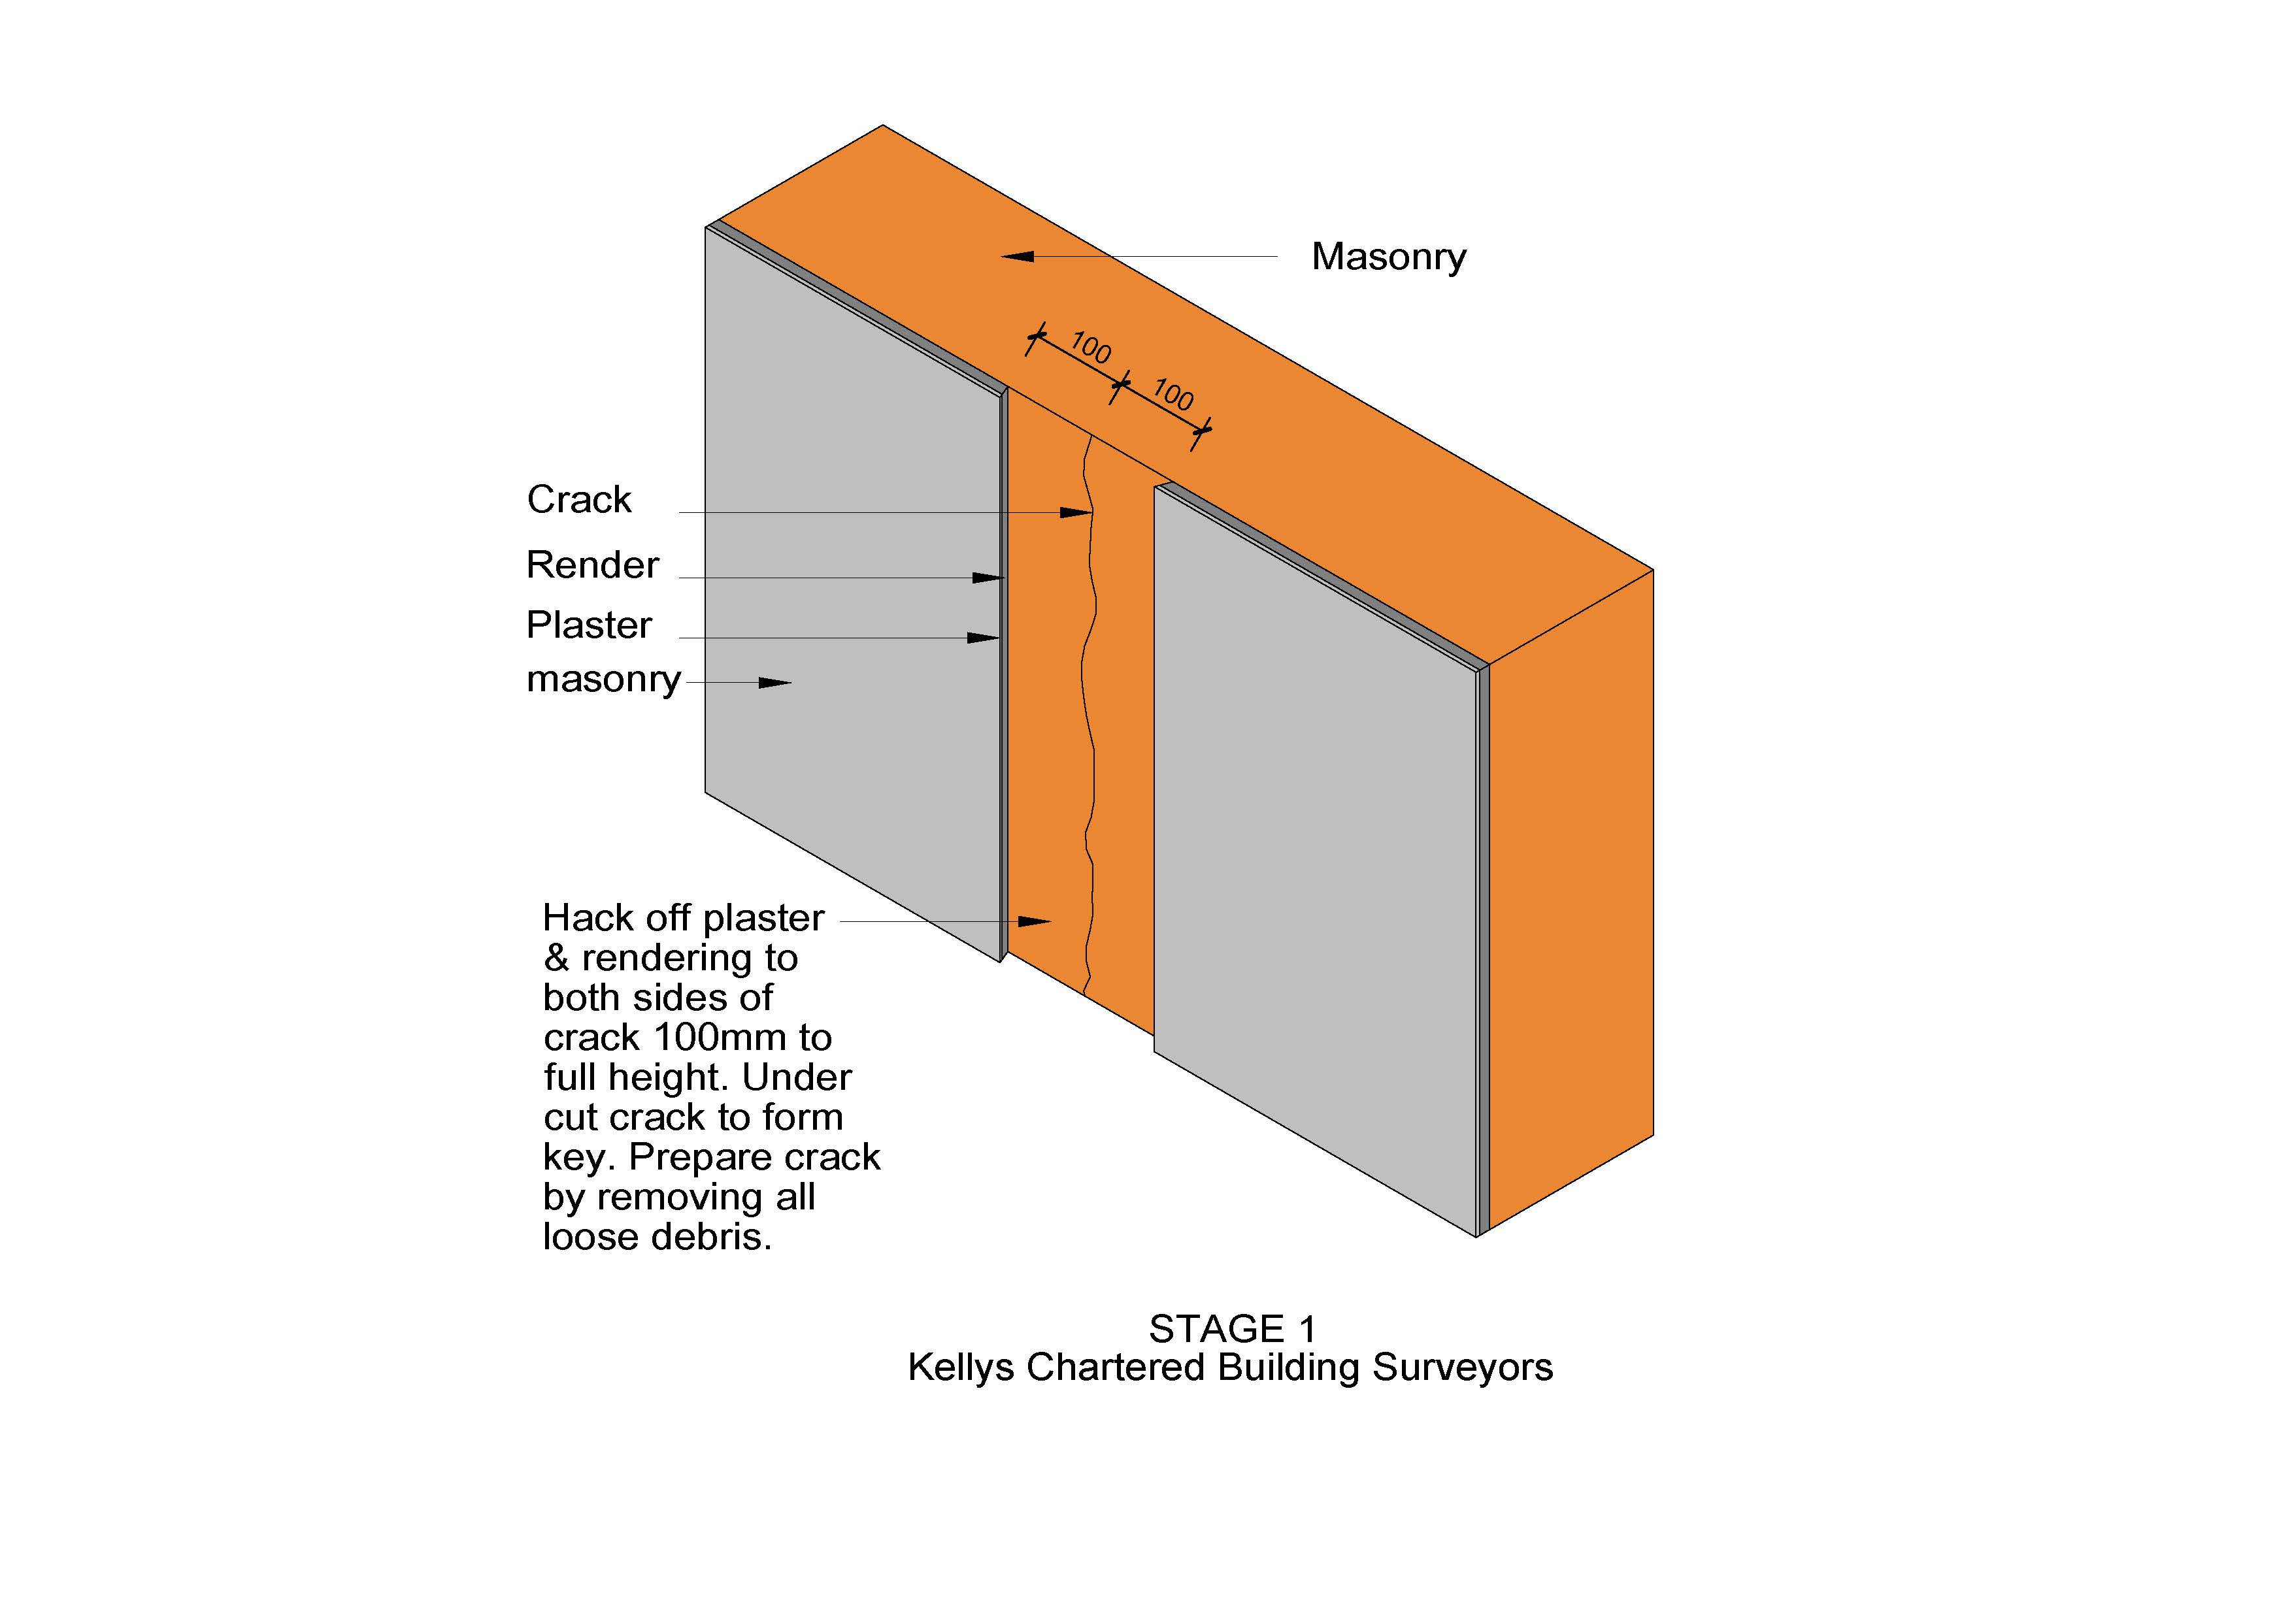
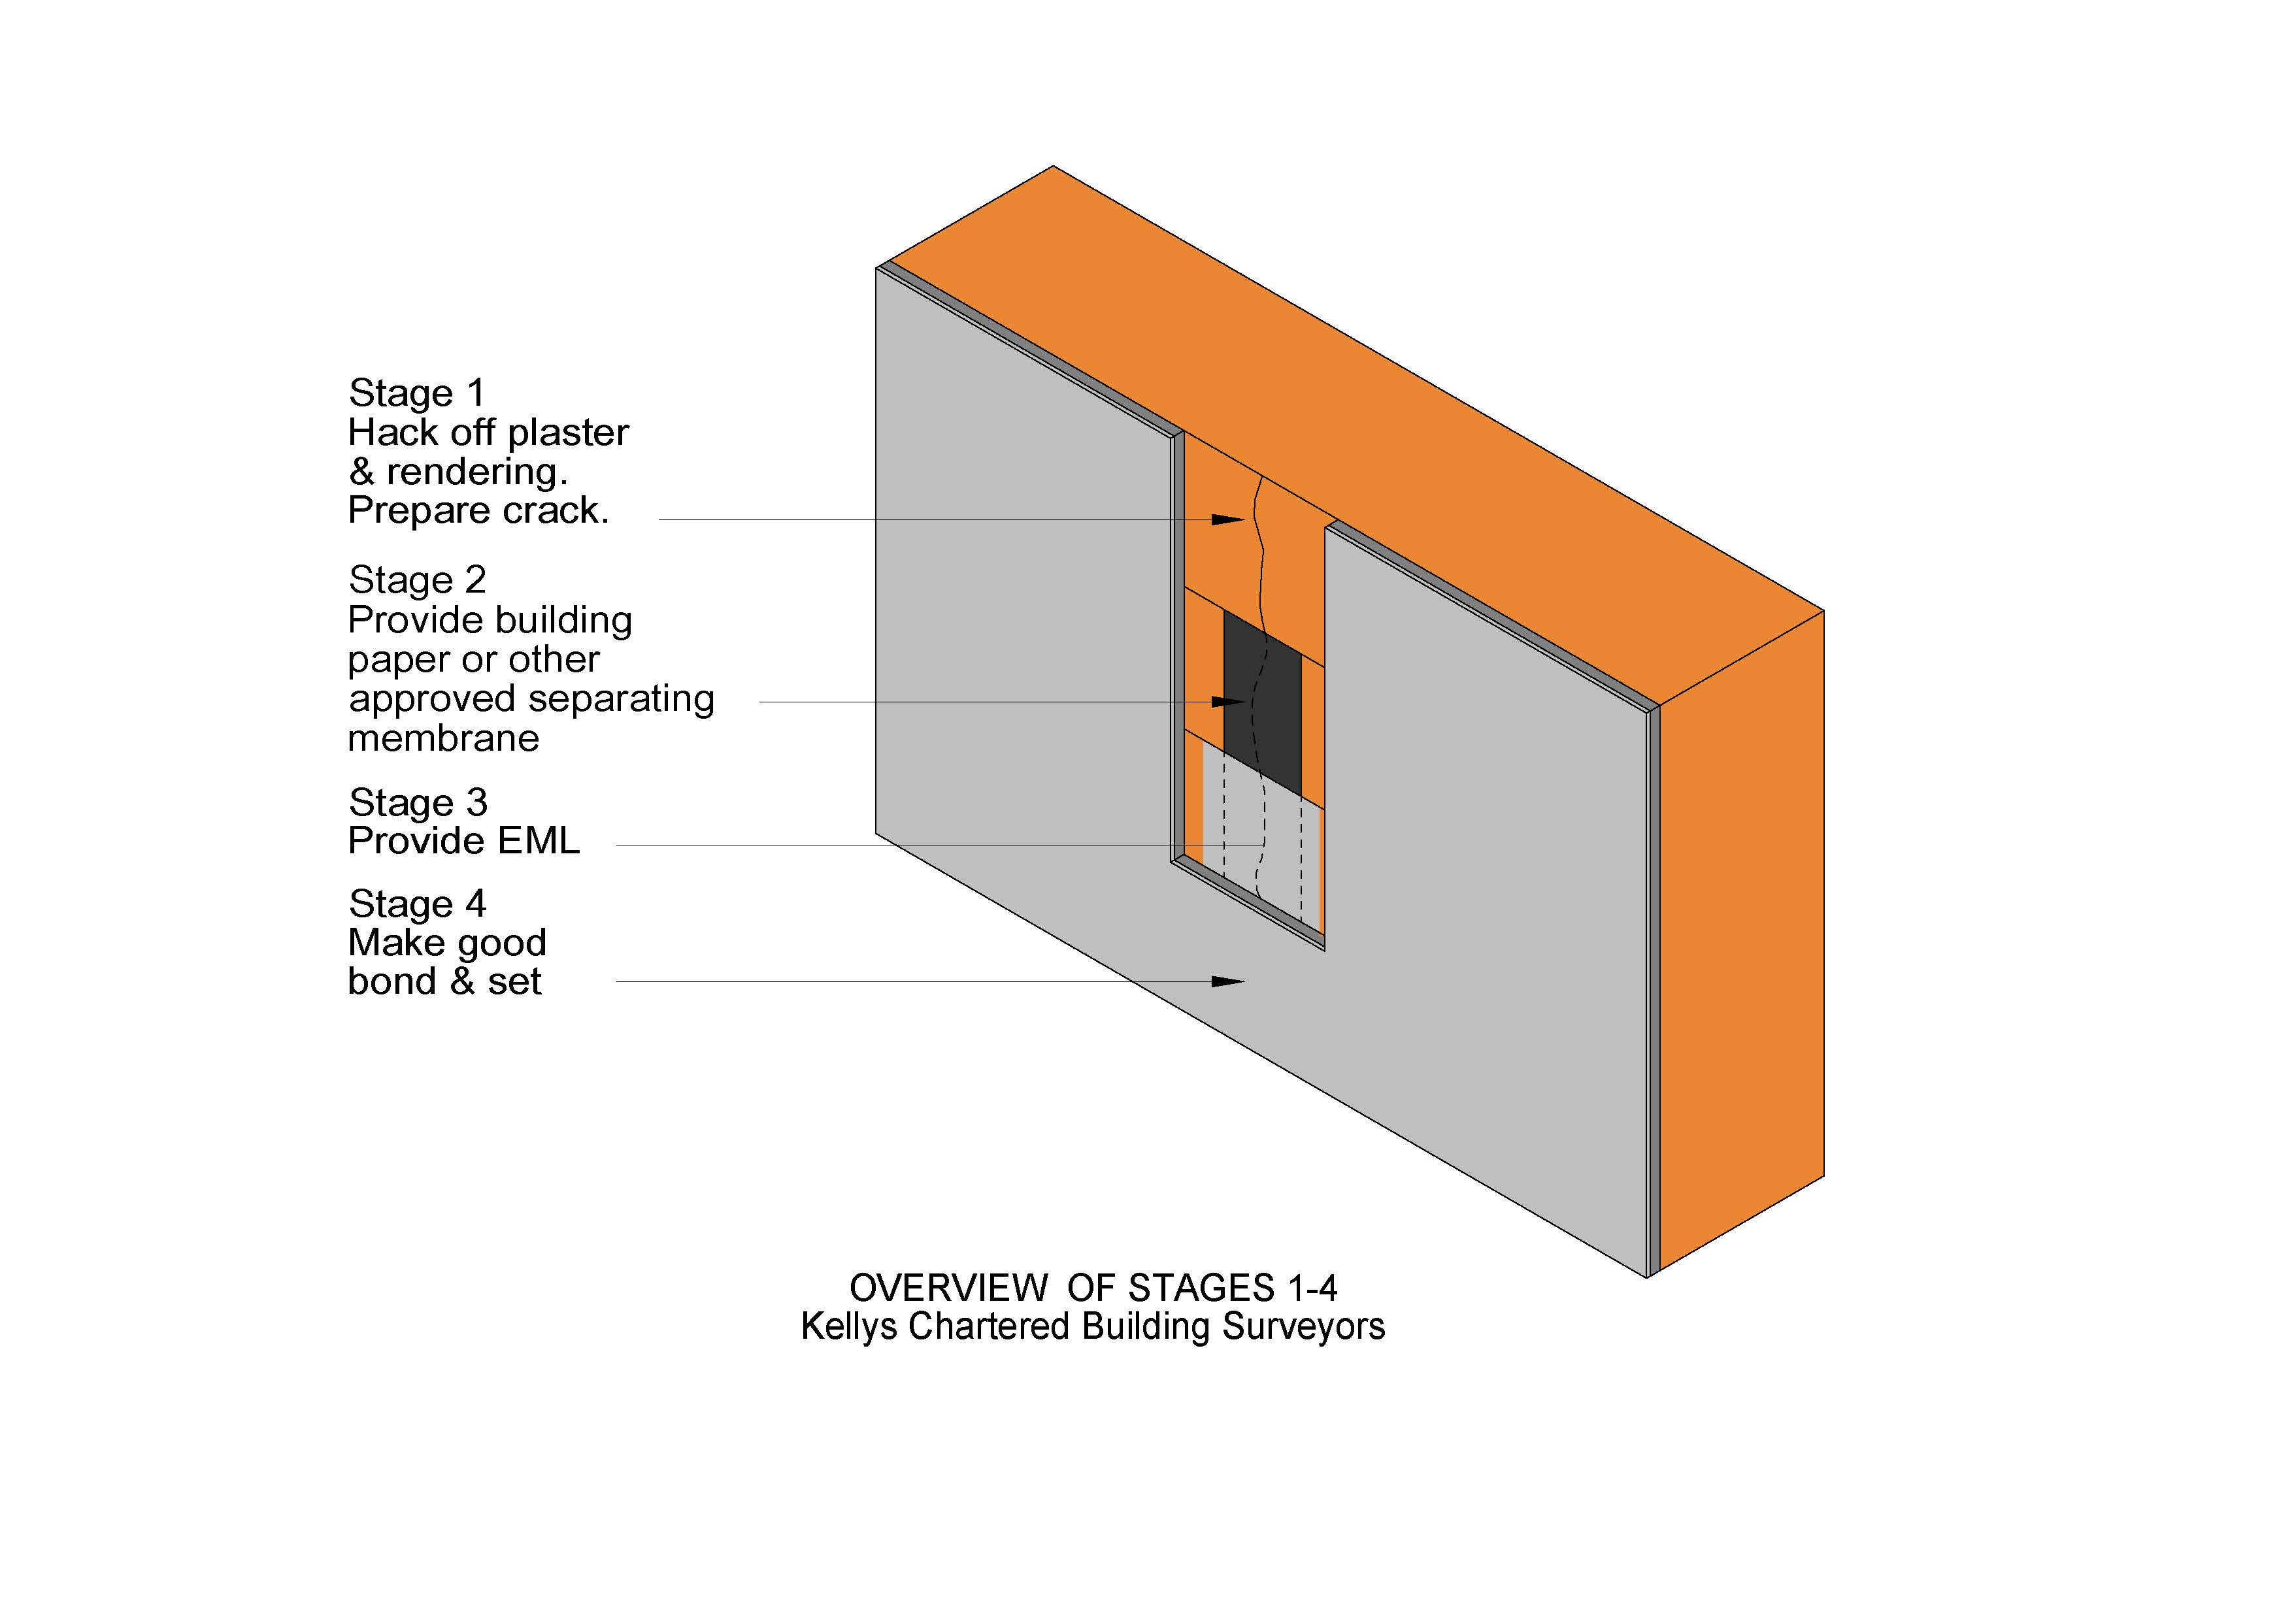
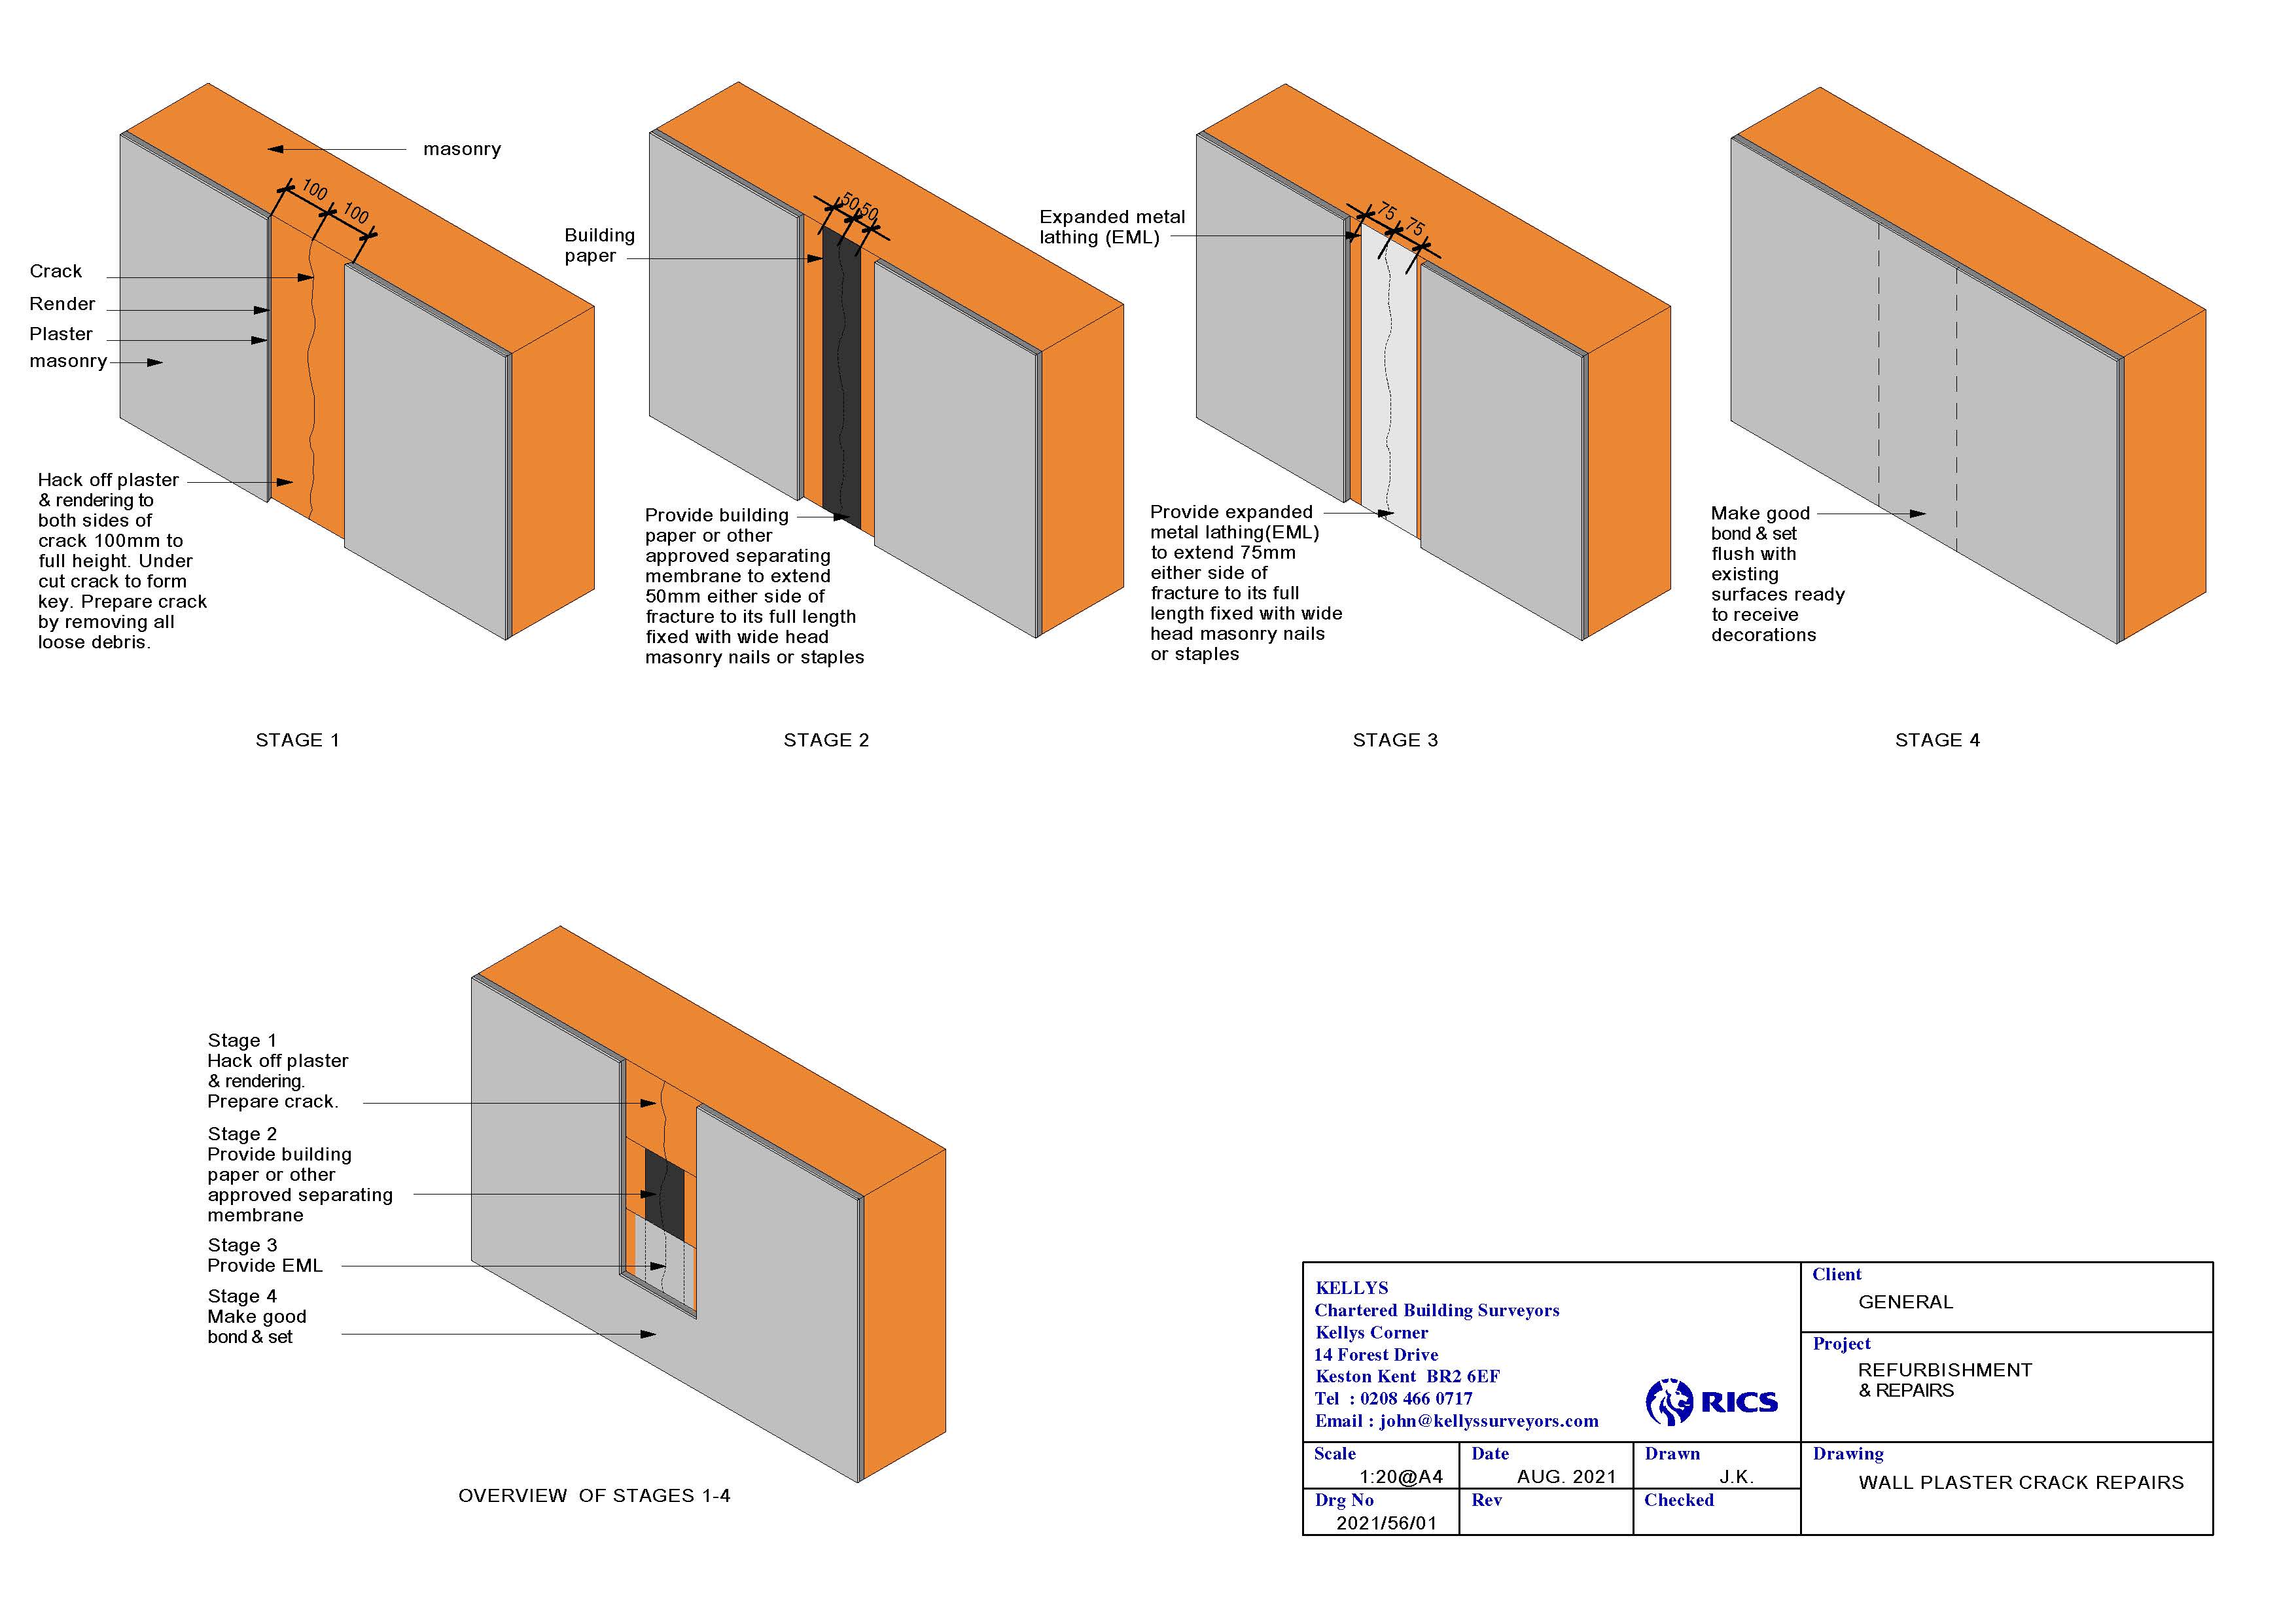
Stage 1
Firstly, hack off plaster to both sides of the crack 100mm to the full height. This is to create a clear work zone, as cracks in the brickwork do not often line up with the cracks in the plaster. Importantly, ensure that the surrounding plaster is not “blown”, which means it has de-bonded / detached from the brickwork. If so, remove the blown plaster. Secondly, cut the crack to form a key. This is to widen and clean the crack, removing the spalled / jagged edges. Thirdly, prepare the crack by removing all the debris.
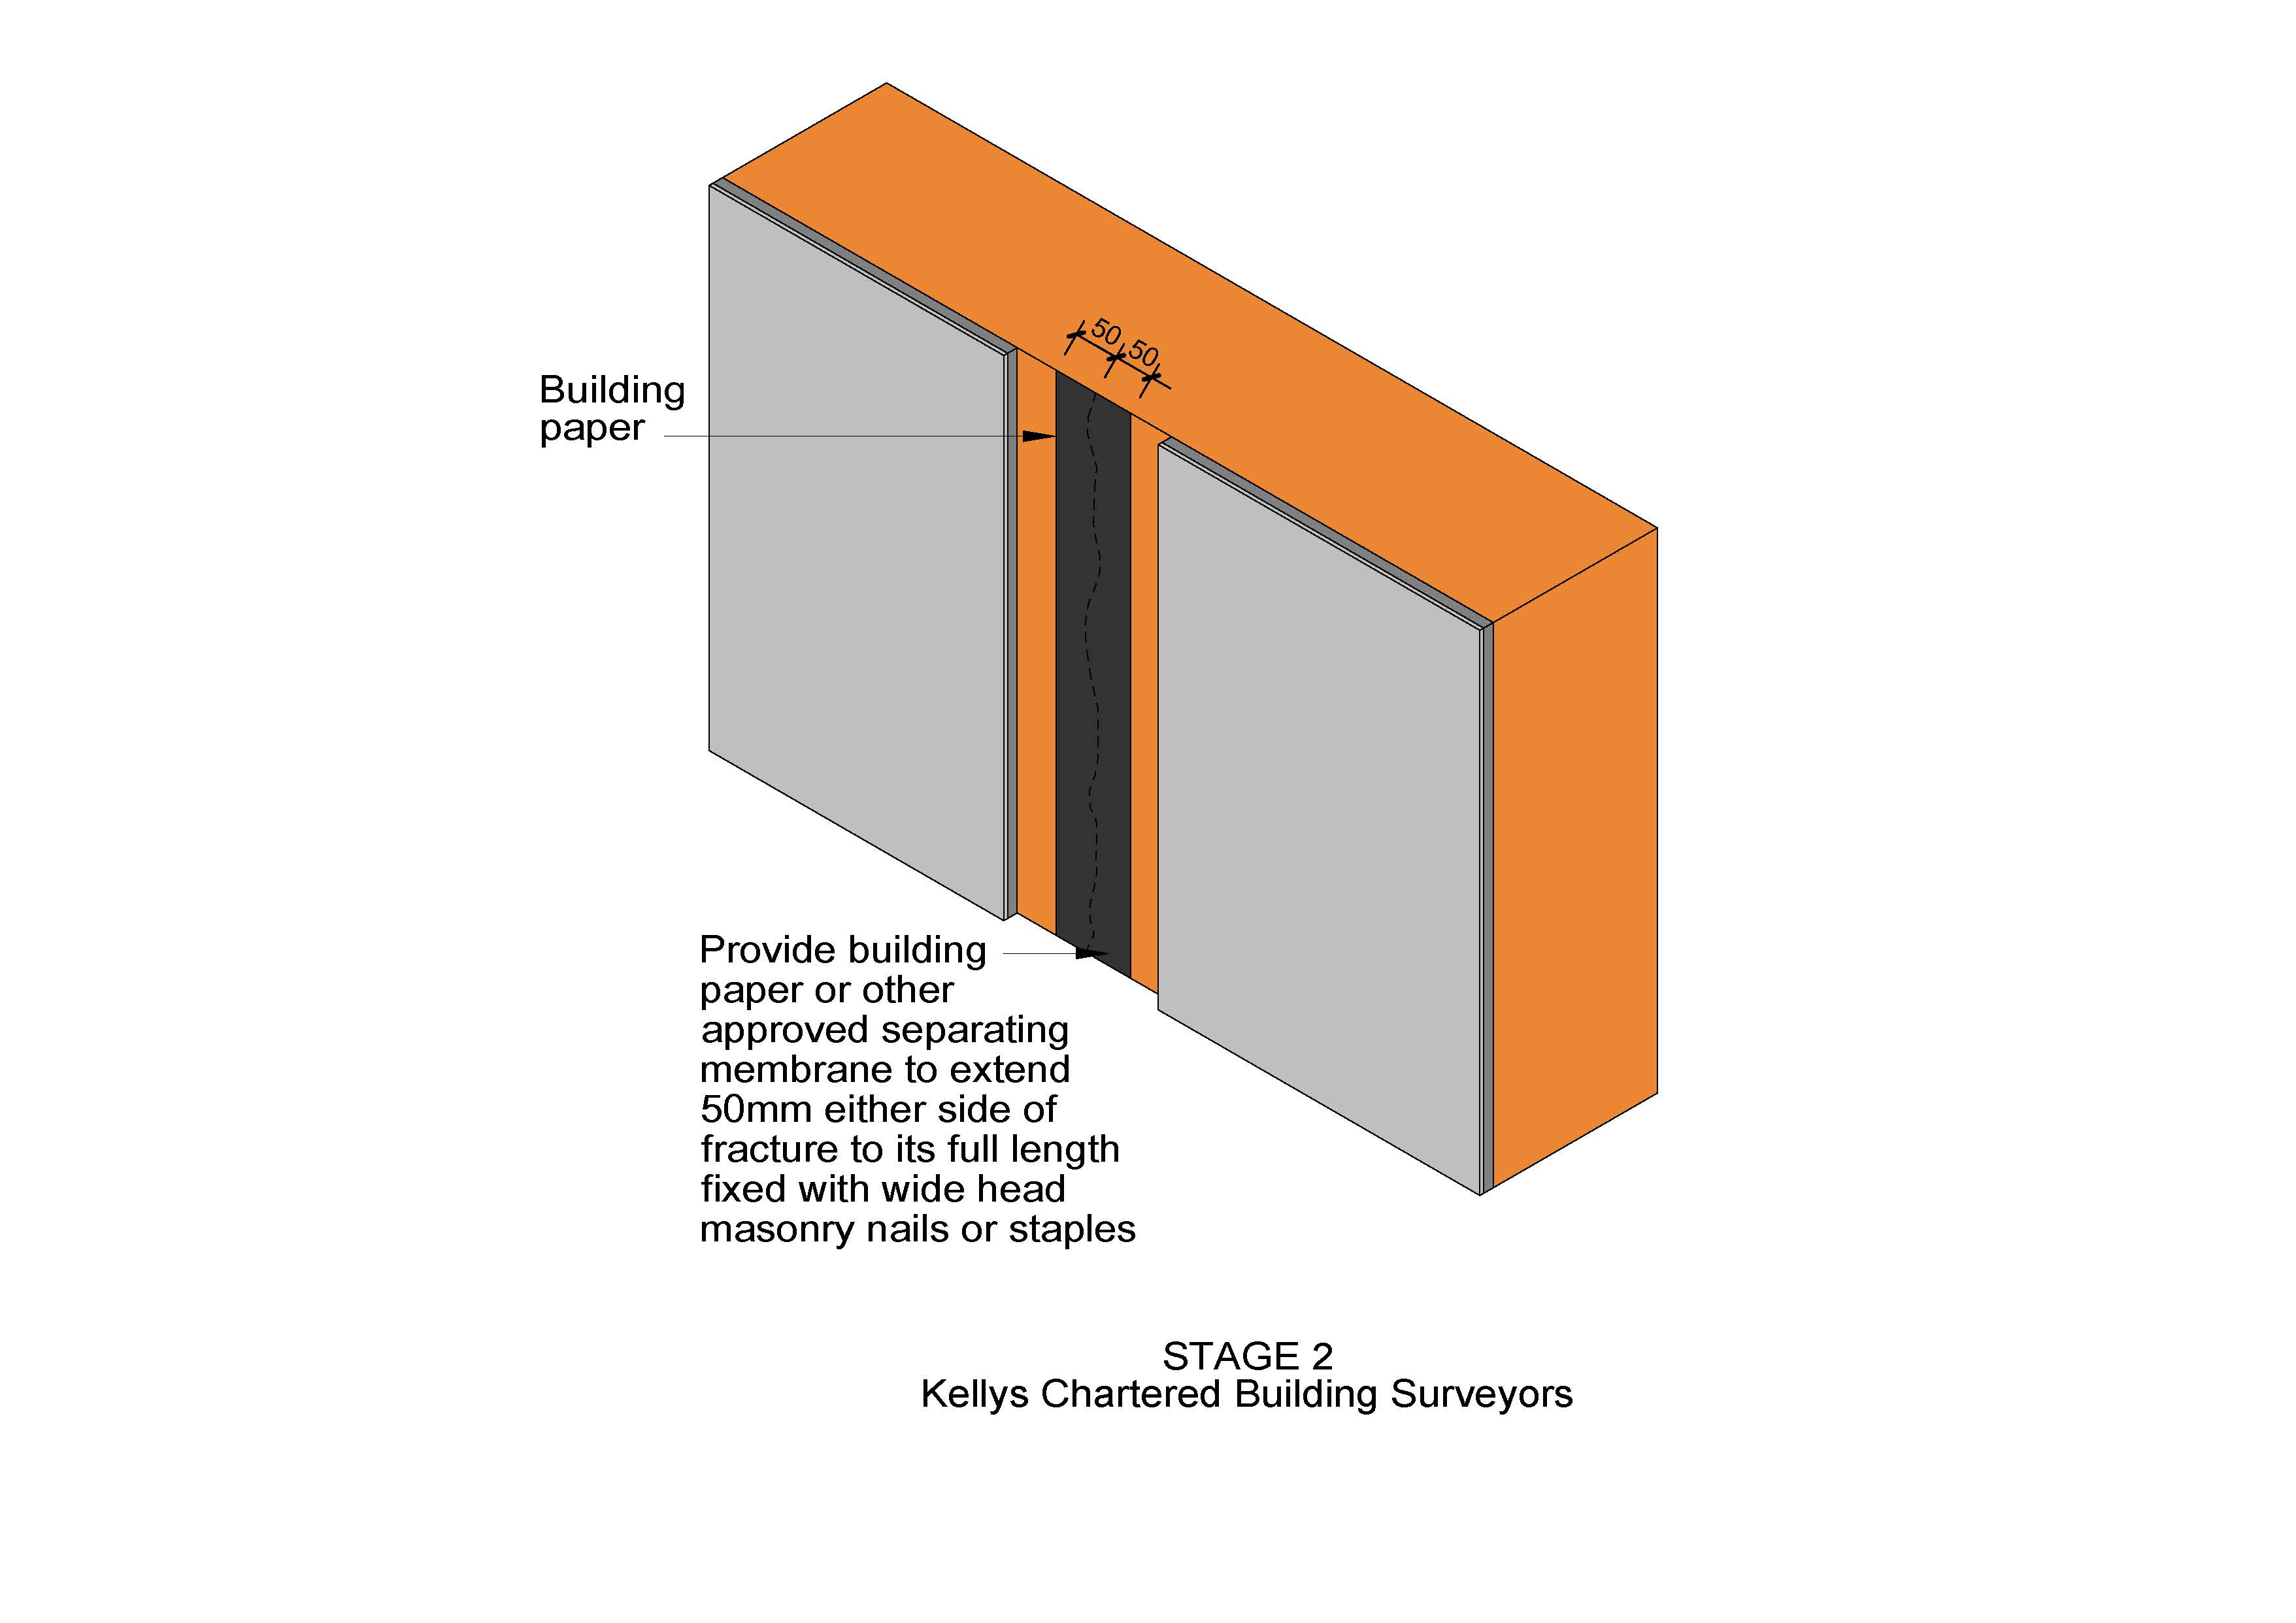
Stage 2
Provide building paper or other approved separating membrane to extend 50 mm on either side of the fracture to its full length, fixed with wide-head masonry nails or staples.
Its primary job is to ensure the new mortar/plaster does not "grab" the moving edges of the keyed crack. As a result, it keeps the two materials separate so they can move at different rates, i.e. differential movement.
The purpose of the separating membrane is to act as a "slip plane," allowing the masonry to move independently behind the finished surface.
Notably, in this specific case, following the installation of a tree root barrier, the soil will no longer be dehydrated by roots and will begin to reabsorb moisture. This leads to a process known as rehydration heave, where the expanding clay soil exerts upward pressure on the foundations, gradually pushing the wall back toward its original position.
Therefore, by installing this expandable membrane over the fracture, we ensure that as the building undergoes this structural recovery, the movement is not transferred to the surface, preventing the new plaster from cracking.
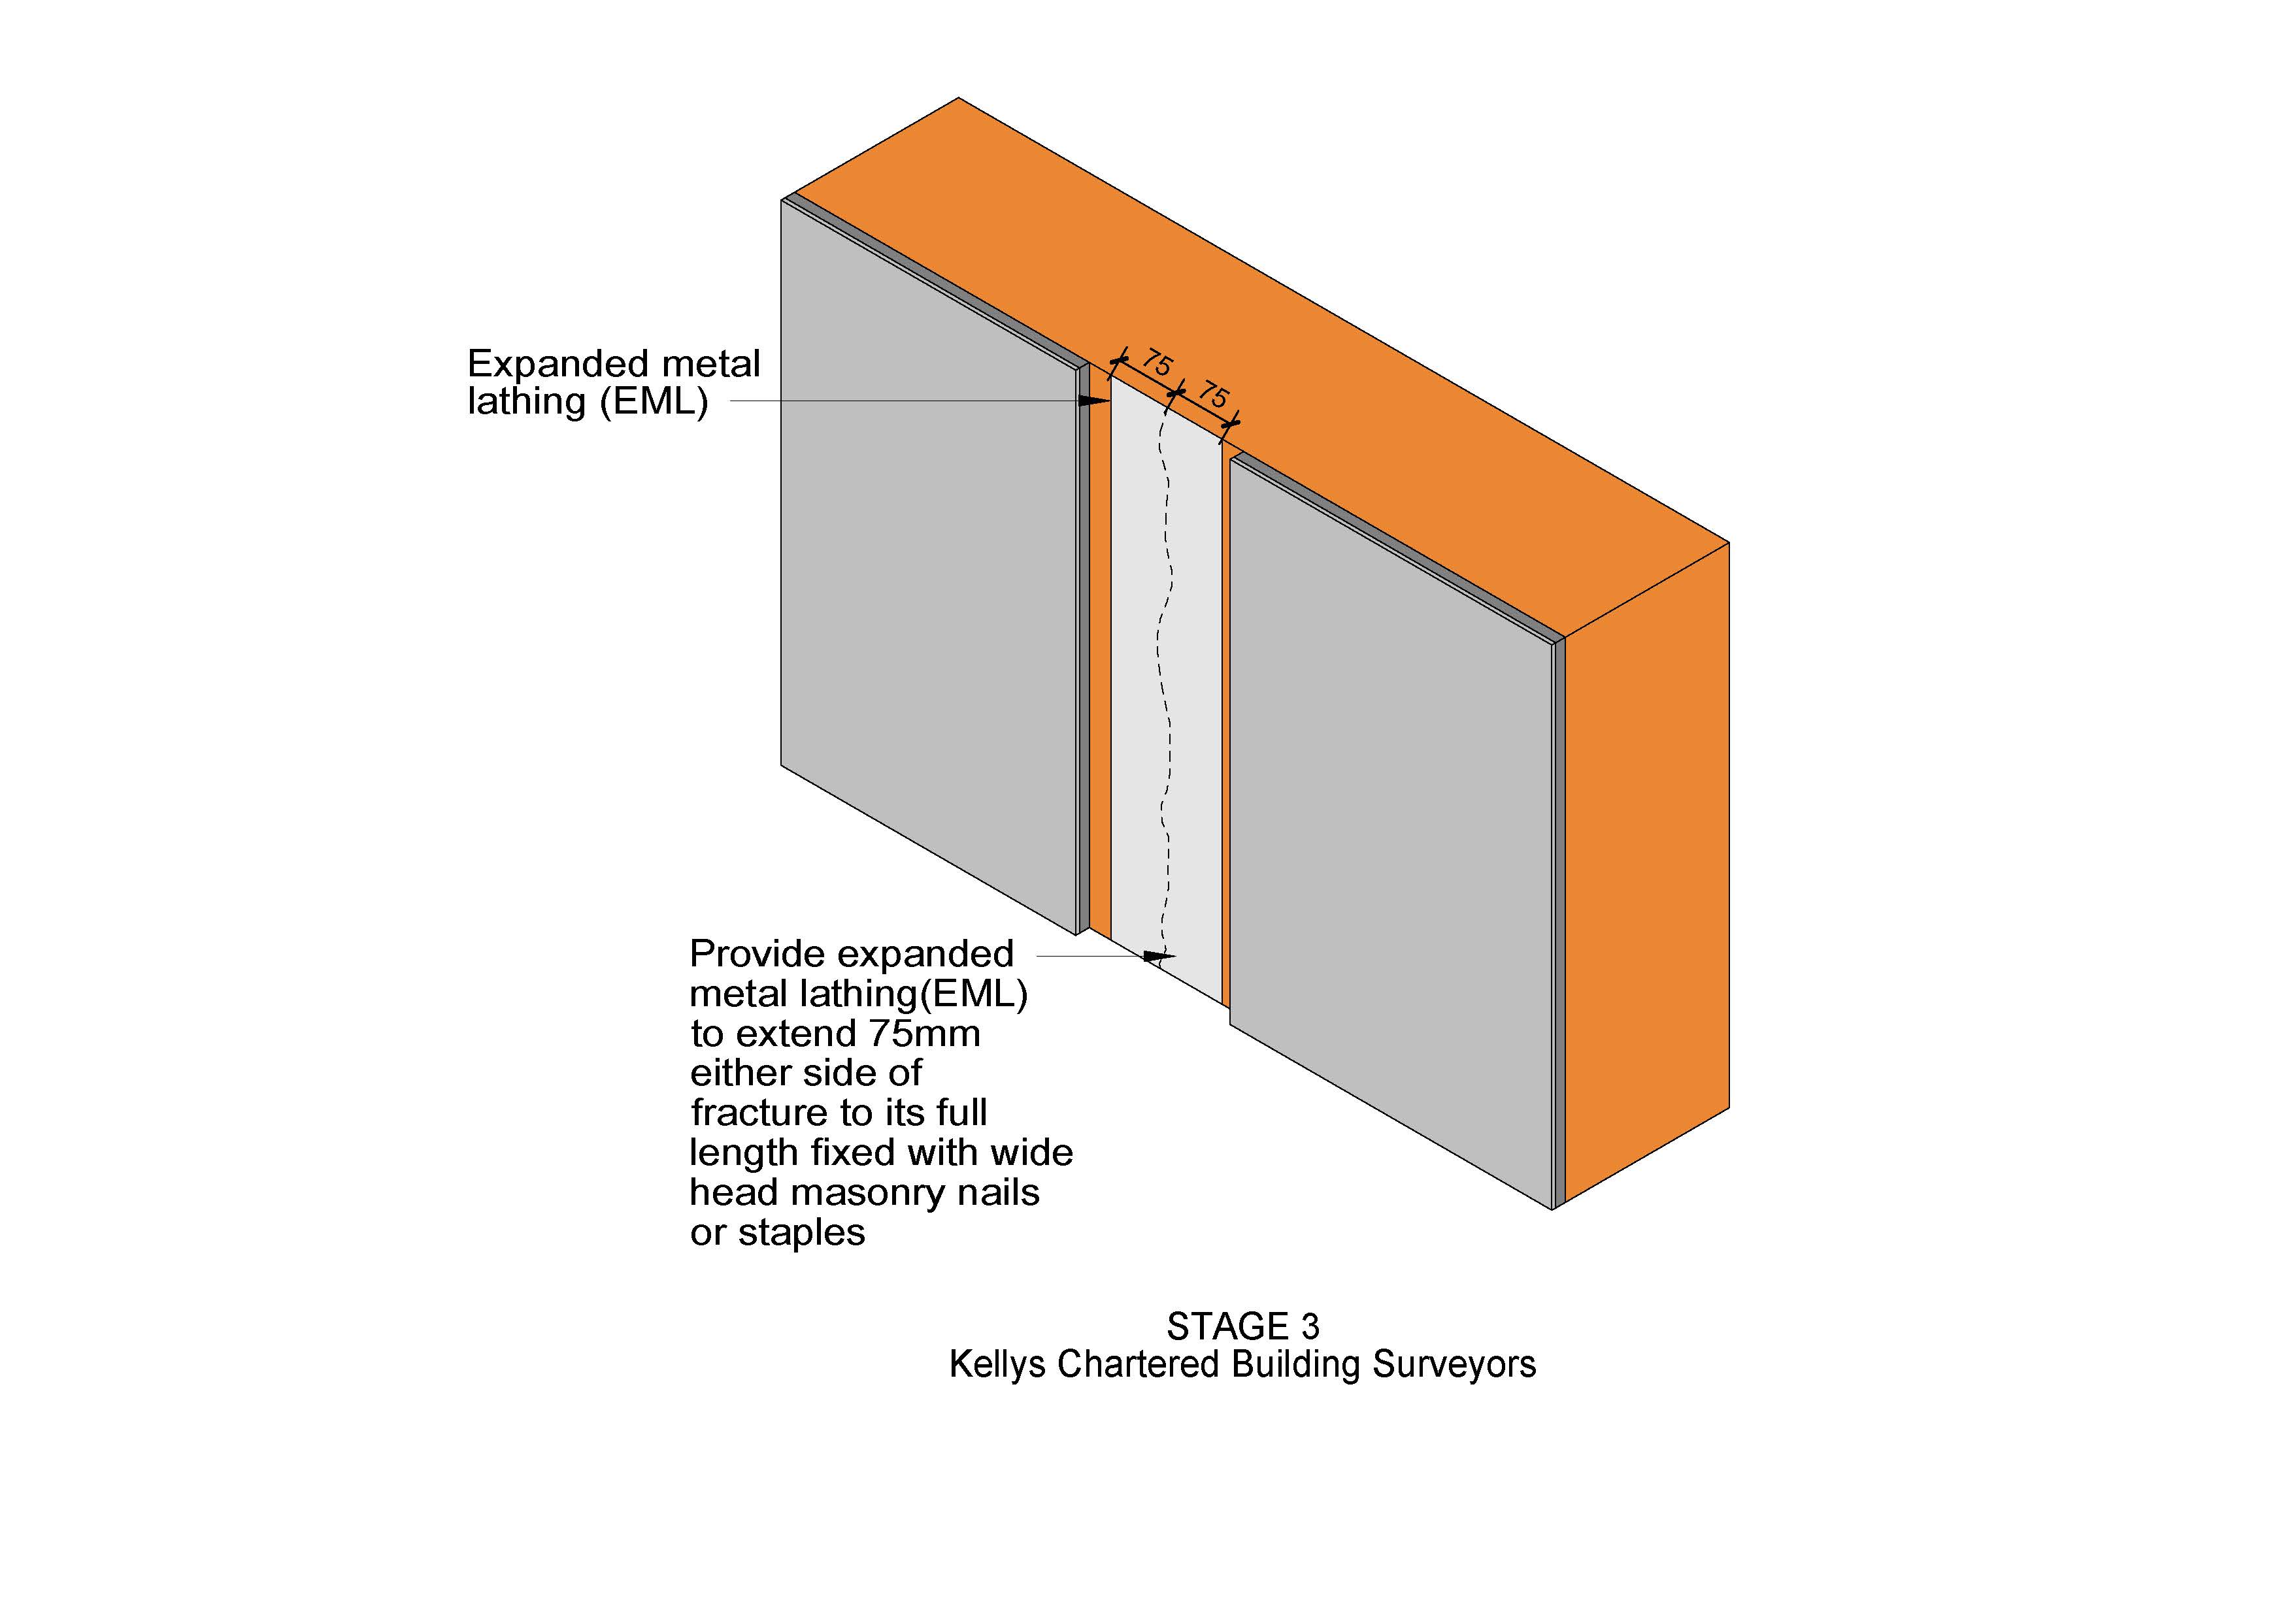
Stage 3
Following the installation of the membrane, we provide expanded metal lathing (EML) to reinforce the new plaster. While traditional plaster is naturally brittle and prone to cracking under tension, the metal lathing provides the necessary tensile strength to keep the surface intact.
This reinforcement is extended 75mm on either side of the fracture into the stable, original masonry to ensure it is securely anchored but not physically fixed to the separating membrane.
We strictly recommend the use of stainless steel lathing for this process. Standard steel is susceptible to corrosion from the moisture within the plaster, which can lead to rusting and cause the plaster to "blow" or delaminate from the wall. Using stainless steel ensures the longevity and integrity of the repair.
The proposed method creates a flexible repair system. By allowing subtle structural movement to continue behind the scenes during the soil’s recovery period, we ensure that the internal plaster finishes and decorations remain unaffected and crack-free.
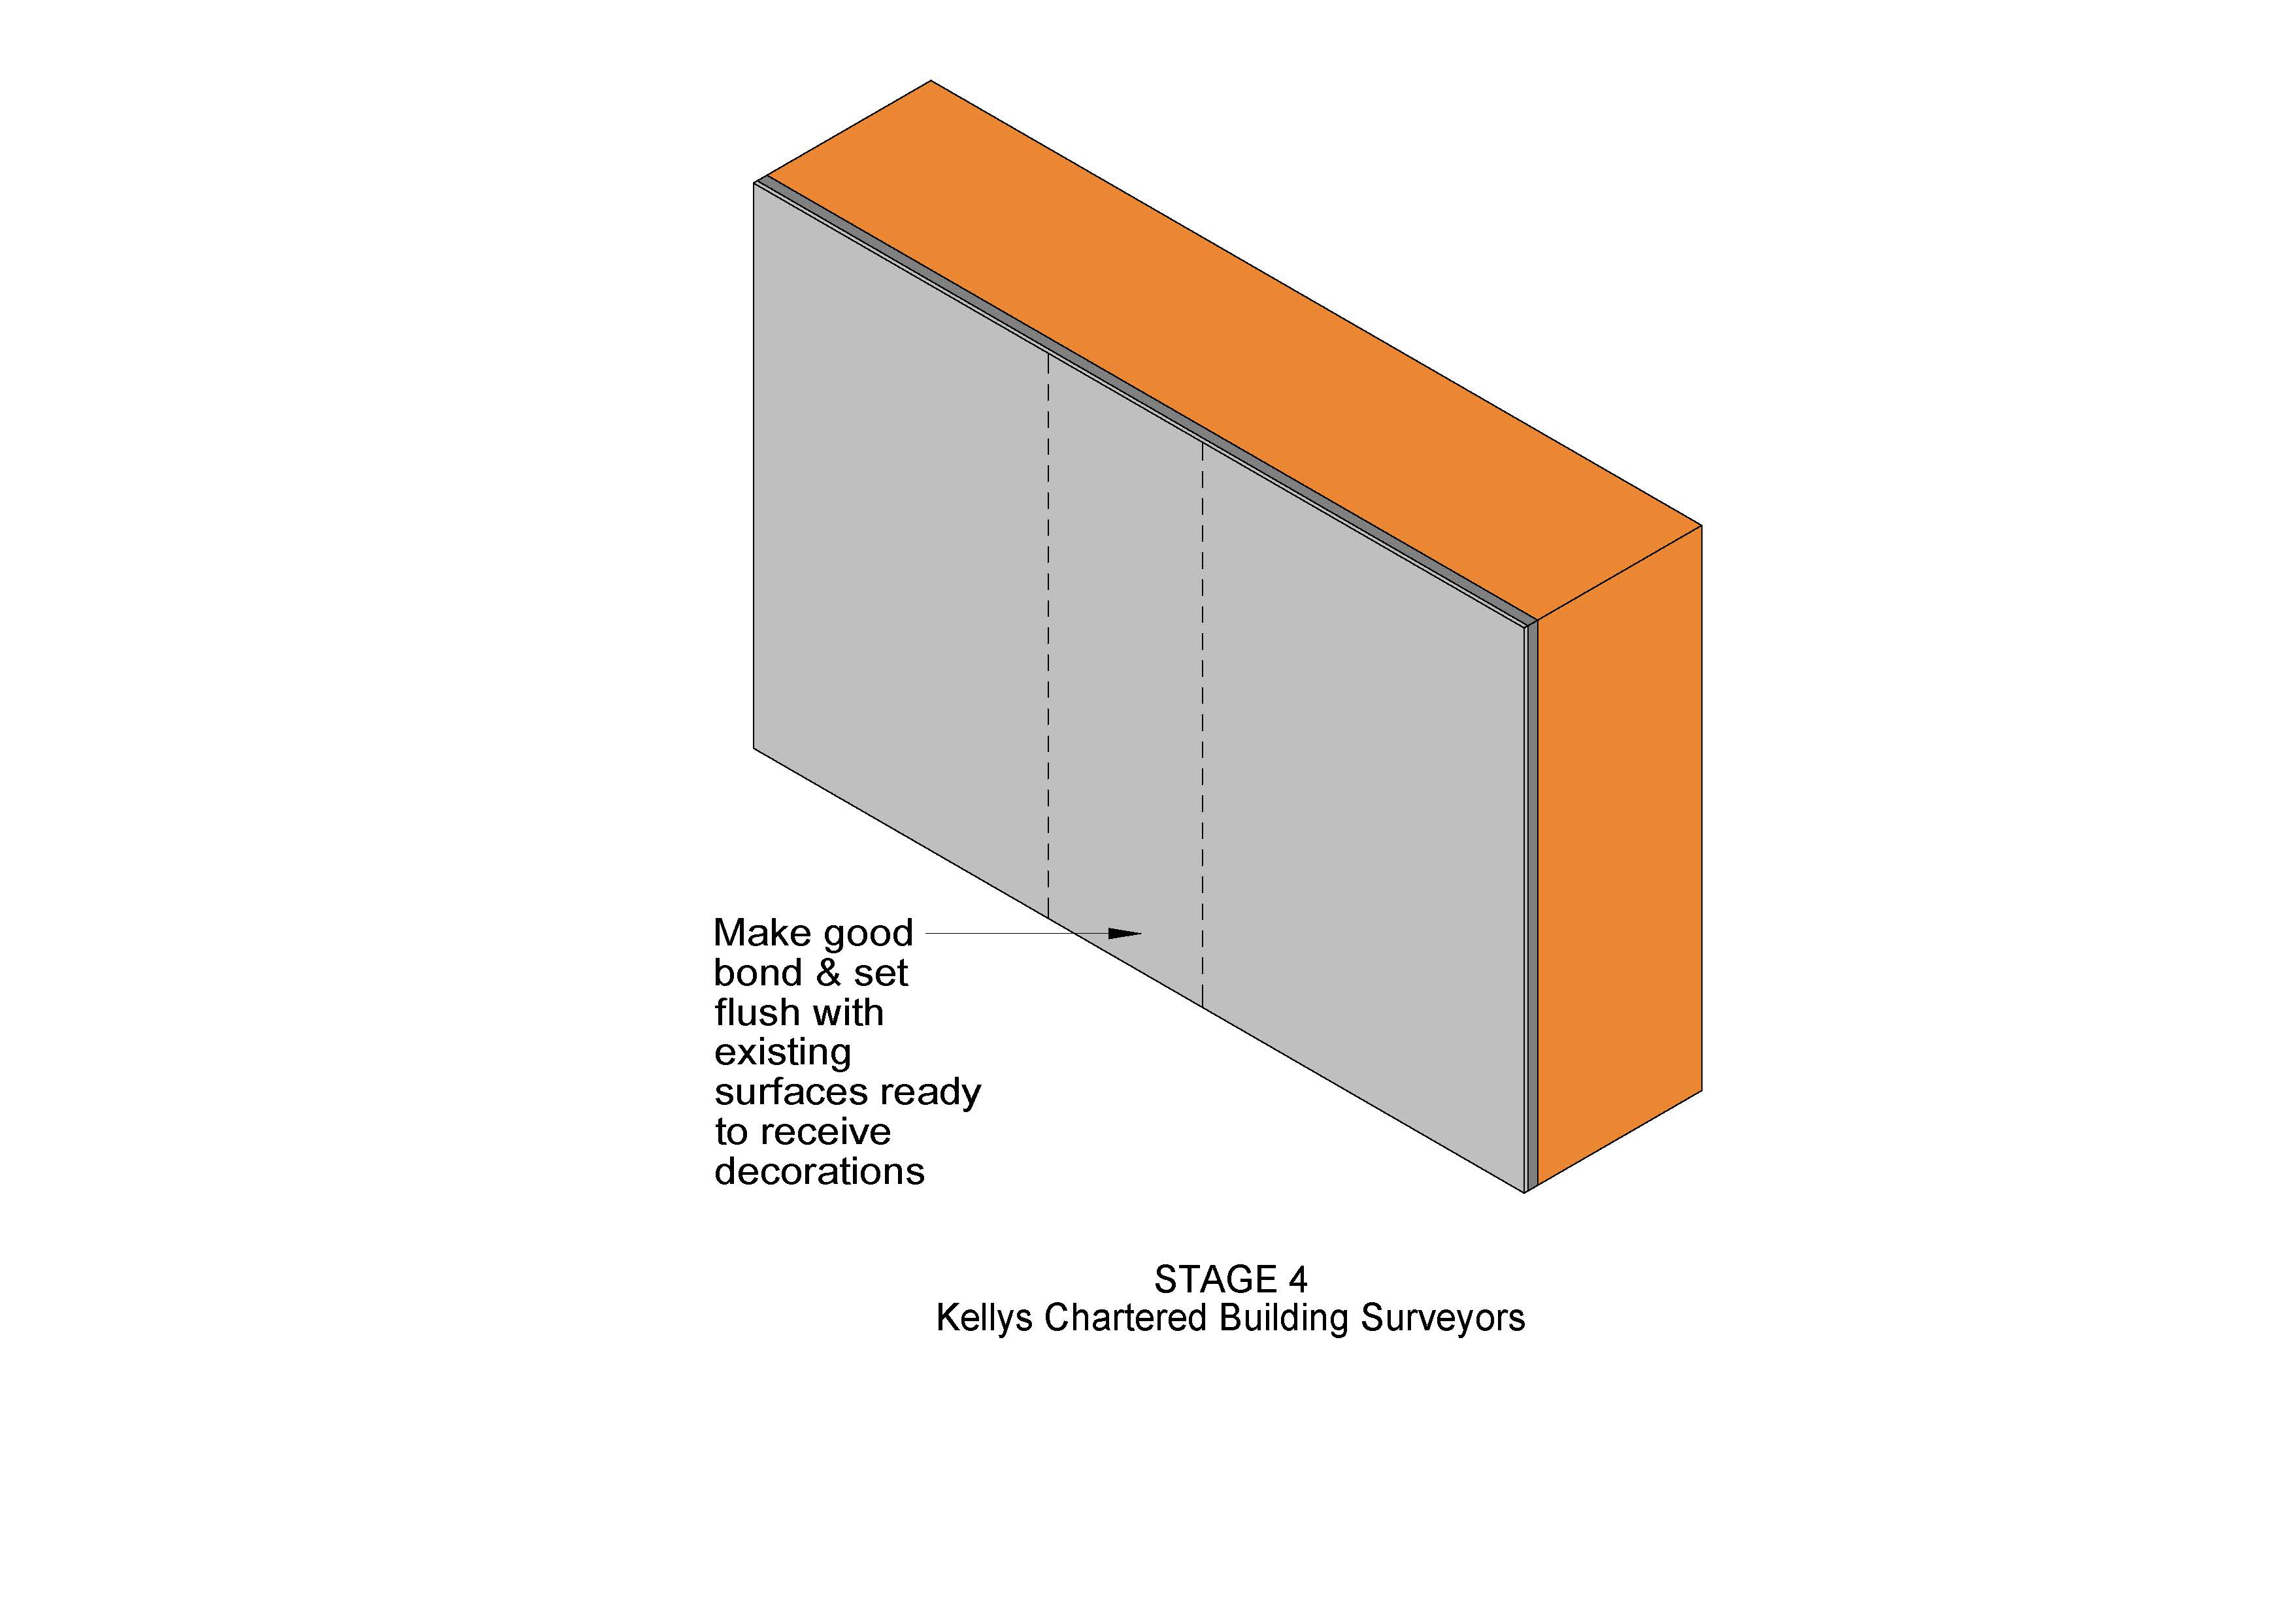
Stage 4
Once the reinforcement is in place, the area is professionally plastered to make good the surface. The final coat is set flush with the existing wall surfaces, ensuring a flush repair between the repair zone and the original plastered finishes.
Stages 1-4 - Summary of the Repair Process
Stage 1: Preparation & Keying
Remove 100mm of plaster on both sides of the crack and mechanically "key" the masonry and undercut the render into a clean V-shape to ensure a strong structural bond.
Stage 2: Separation Membrane
A separation membrane is installed over the fracture to allow a "slip plane." This allows the wall to move during the soil’s rehydration process without snapping the surface finish.
Stage 3: Stainless Steel Metal Lathing
Fix stainless steel expanded metal lathing (EML) 75mm into the stable brickwork. This provides the tensile strength needed to hold the plaster in place while preventing future rust or "blown" plaster. It also allows minor spread of movement behind the EML without causing cracking on the surface.
Stage 4: Final Finishing
The area is plastered and set flush with the existing wall plastered finishes, providing a seamless surface that is fully stabilised and ready for final decoration.
Summary: A Long-Term Solution for Structural Cracks
Repairing a structural crack requires more than just a surface-level fix; it requires a strategy that respects the movement of the building. By following this professional four-stage methodology, Preparation, Separation, Reinforcement, and Finishing, you ensure the repair is as resilient as the wall itself.
The use of a "slip plane" and stainless steel lathing allows the masonry to undergo its natural recovery and rehydration process without damaging your interior decorations. This technical approach moves away from temporary patches and toward a flexible, permanent solution that maintains both the structural integrity and the aesthetic value of your property.
Expert Guidance from Kellys Chartered Building Surveyors
Identifying the difference between a minor cosmetic issue and a significant structural failure is the first step in protecting your home. If you are concerned about cracks in your property, do not leave the diagnosis to chance.
At Kellys Chartered Building Surveyors, we provide expert structural assessments to identify the root cause of movement and provide you with a clear, actionable path to repair.
Contact us today to schedule a professional survey and ensure your property remains on solid ground.
Professional Guidance & Limitations
Disclaimer: Please note that every property and case of subsidence is unique. The methods described in this post are based on a specific scenario involving tree root moisture extraction and clay soil. The suitability of any repair method depends entirely on a professional site investigation and structural assessment.
This information is for educational purposes and may not be the most appropriate solution for your specific property. We strongly recommend consulting with a qualified structural engineer or building surveyor before undertaking any remedial works.